Header Component Guide
– – –
This is the guide for the Pixelgrade Header component. We will tackle both behaviour and technical details.
What Does It Do?
The Header component takes care of the markup and logic of the top <header> section of the <body>. It handles everything about the top menus and branding of the site (logo or site title), including social menus.
By default, we will register 3 menus:
- a
primary-leftmenu; - a
primary-rightmenu; - and it registers support for the Jetpack Social Menu.
A theme can modify this as it is all configurable: how many zones, what menus, where do they go, what is their behaviour with regards to the other menus, you name it :)
It also adds support for the custom-logo core feature introduced in WordPress 4.5, that will be used to allow our customers to upload their logo through the Customizer.
Lastly, but not the least, it adds a Header Customizer options section (via our Customify plugin) that provides a decent amount of layout and styling controls for the header elements.
What It Doesn’t Do?
The Header component will not handle (nor should it) the <head> part the page. That is usually found in the theme’s header.php root file. Do not confuse these two.
The Header component will not handle any header background images or sliders that might sight behind or bellow its menus and branding. Those will be handled by other components (Heroes anyone?).
How It Works?
Using the pixelgrade_header action hook it outputs the markup found in the component’s templates/header.php file (this is hooked in Pixelgrade_Header->register_hooks()).
So, for this component to work, the theme must provide the following hooks (usually found in the theme’s header.php file):
<?php
/**
 * pixelgrade_before_header hook.
 *
 * @hooked nothing() - 10 (outputs nothing)
 */
do_action( 'pixelgrade_before_header', 'main' );
?>

<?php
/**
 * pixelgrade_header hook.
 *
 * @hooked pixelgrade_the_header() - 10 (outputs the header markup)
 */
do_action( 'pixelgrade_header', 'main' );
?>

<?php
/**
 * pixelgrade_after_header hook.
 *
 * @hooked nothing() - 10 (outputs nothing)
 */
do_action( 'pixelgrade_after_header', 'main' );
?>
We only need the middle hook (pixelgrade_header), but we strongly recommend keeping all three as it allows for others to be able to reliably relate to the header component and add things around it.
This component doesn’t have any static assets of its own (like .css or .js), but it does have in its /scss folder the necessary frontend logic for handling layout. So you should include /components/header/scss/_main.scss this in your theme’s SCSS and add your styling.
The image bellow explains all the default different behavioural cases and how the Header component handles them (think of it in terms of something is missing and what happens) - click on it for a bigger version:
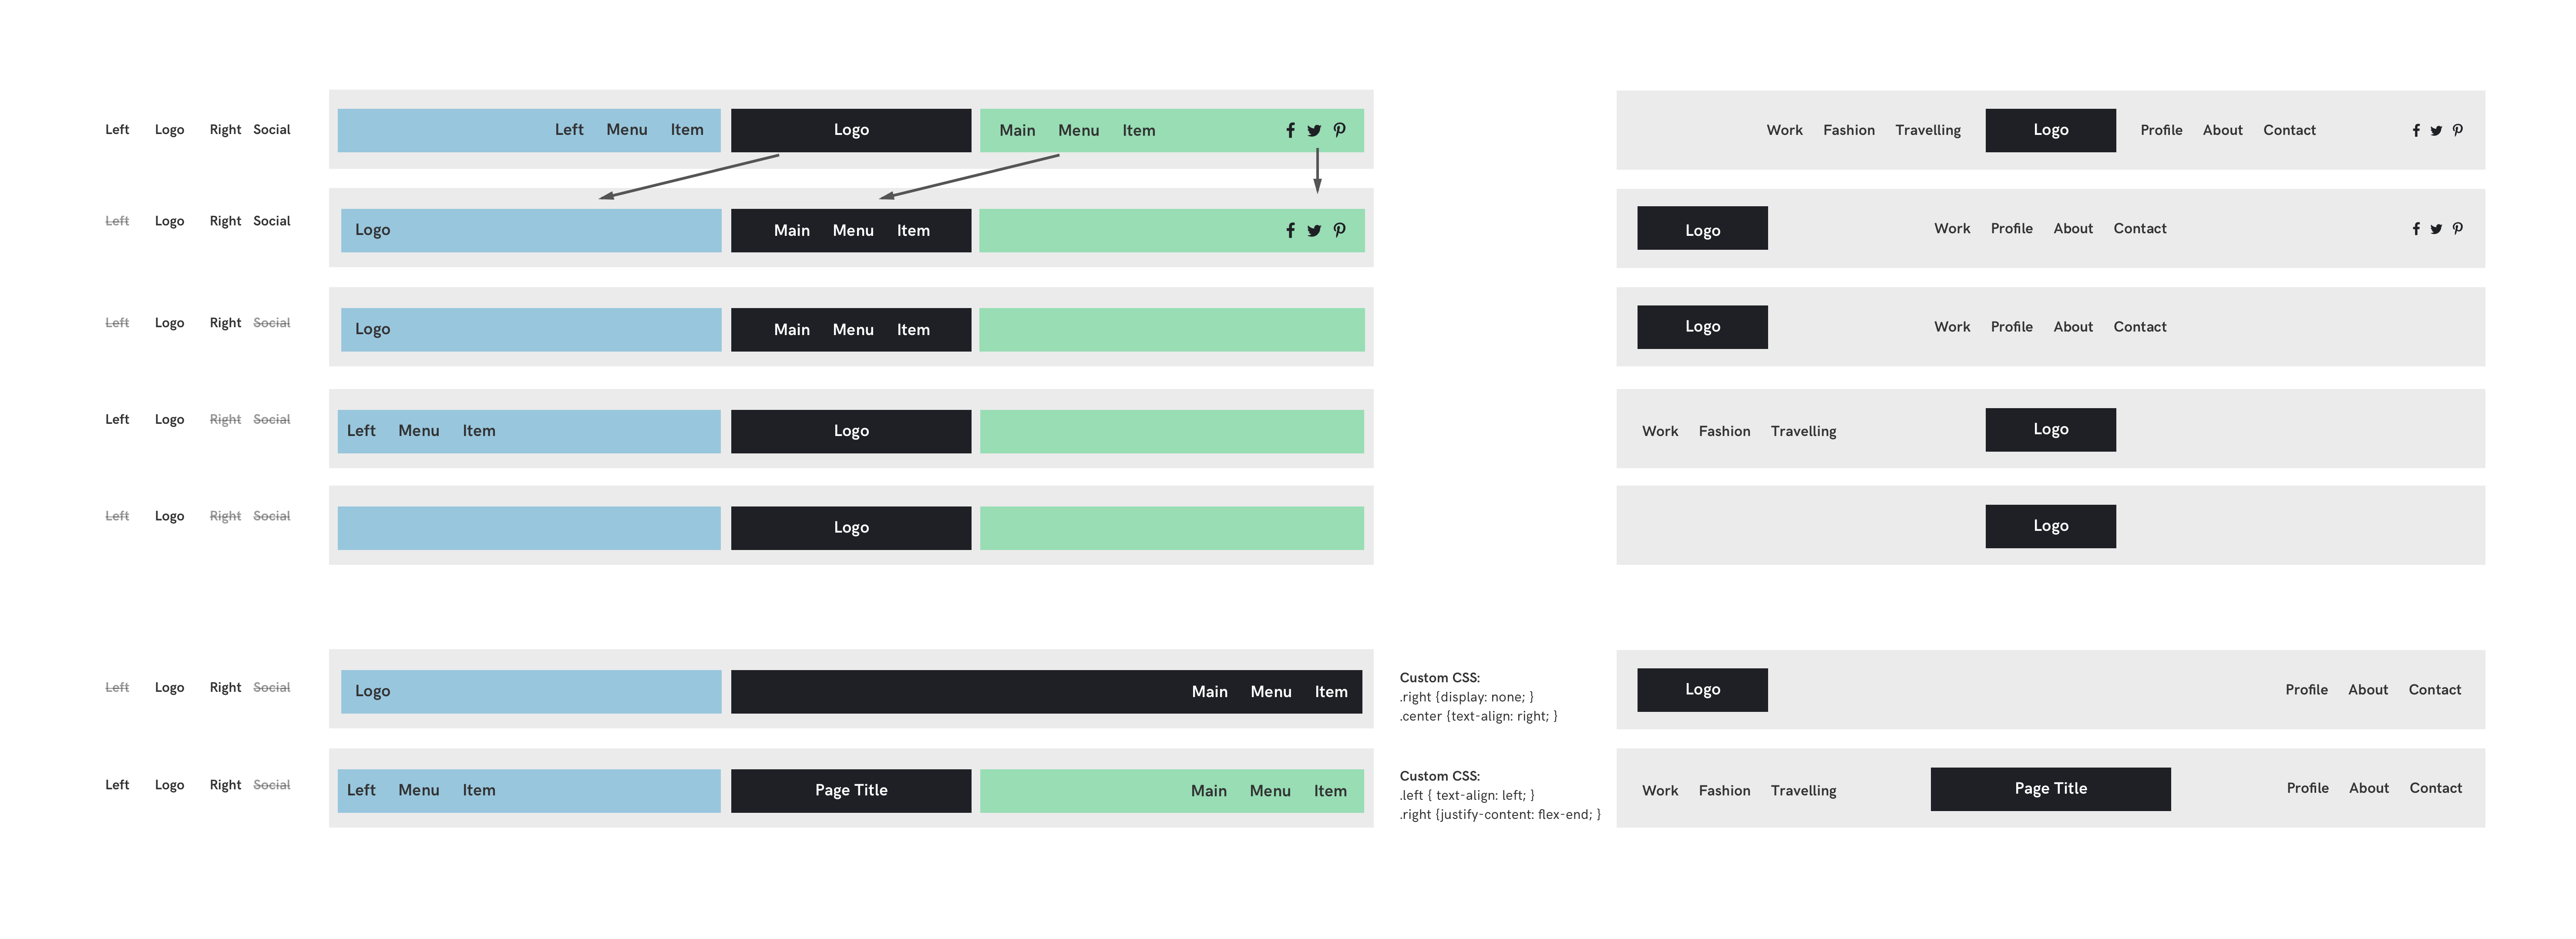
Again, this is the default way of working. You have full flexibility to adjust this from a theme.
Important Technical Details
All customizations done by a theme to a component should reside in the /inc/components.php file, regardless if there are dedicated files for certain integrations (Customify comes to mind). This ensures that one can identify quickly the way a theme interacts with components.
Customizing the Component’s Behaviour
As stated above, you can change a great deal of things about what and how the component does. Lets walk through the various aspects of it.
This is how the default configuration of the header looks like:
$this->config = array(
	'zones' => array(
		'left' => array( // the zone's id
			'order' => 10, // We will use this to establish the display order of the zones
			'classes' => array(), //by default we will add the classes 'c-navbar__zone' and 'c-navbar__zone--%zone_id%' to each zone
			'display_blank' => true, // determines if we output markup for an empty zone
		),
		'middle' => array( // the zone's id
			'order' => 20, // We will use this to establish the display order of the zones
			'classes' => array(), //by default we will add the classes 'c-navbar__zone' and 'c-navbar__zone--%zone_id%' to each zone
			'display_blank' => true, // determines if we output markup for an empty zone
		),
		'right' => array( // the zone's id
			'order' => 30, // We will use this to establish the display order of the zones
			'classes' => array(), //by default we will add the classes 'c-navbar__zone' and 'c-navbar__zone--%zone_id%' to each zone
			'display_blank' => true, // determines if we output markup for an empty zone
		),
	),
	'menu_locations' => array(
		'primary-left' => array(
			'title' => esc_html__( 'Header Left', 'components' ),
			'default_zone' => 'left',
			// This callback should always accept 3 parameters as documented in pixelgrade_header_get_zones()
			'zone_callback' => false,
			'order' => 10, // We will use this to establish the display order of nav menu locations, inside a certain zone
			'nav_menu_args' => array( // skip 'theme_location' and 'echo' args as we will force those
				'menu_id'         => 'menu-1',
				'container'       => 'nav',
				'container_class' => '',
				'fallback_cb'     => false,
			),
		),
		'header-branding' => array(
			'default_zone' => 'middle',
			// This callback should always accept 3 parameters as documented in pixelgrade_header_get_zones()
			'zone_callback' => array( $this, 'header_branding_zone' ),
			'order' => 10, // We will use this to establish the display order of nav menu locations, inside a certain zone
			'bogus' => true, // this tells the world that this is just a placeholder, not a real nav menu location
		),
		'primary-right' => array(
			'title' => esc_html__( 'Header Right', 'components' ),
			'default_zone' => 'right',
			// This callback should always accept 3 parameters as documented in pixelgrade_header_get_zones()
			'zone_callback' => array( $this, 'primary_right_nav_menu_zone' ),
			'order' => 10, // We will use this to establish the display order of nav menu locations, inside a certain zone
			'nav_menu_args' => array( // skip 'theme_location' and 'echo' args as we will force those
				'menu_id'         => 'menu-2',
				'container'       => 'nav',
				'container_class' => '',
				'fallback_cb'     => false,
			),
		),
	),
);

// Add theme support for Jetpack Social Menu, if we are allowed to
if ( apply_filters( 'pixelgrade_header_use_jetpack_social_menu', true ) ) {
	// Add it to the config
	$this->config['menu_locations']['jetpack-social-menu'] = array(
			'default_zone' => 'right',
			// This callback should always accept 3 parameters as documented in pixelgrade_header_get_zones()
			'zone_callback' => false,
			'order' => 20, // We will use this to establish the display order of nav menu locations, inside a certain zone
			'bogus' => true, // this tells the world that this is just a placeholder, not a real nav menu location
		);

	// Add support for it
	add_theme_support( 'jetpack-social-menu' );
}
Changing the Navigation Zones
By default, we have three zones: left, middle and right. As you can see above, the configuration has a section called zones that defines each zone and it’s attributes, like id, order, classes and whether to display the wrapper if there is no content.
A theme may require a different setup, like: top and bottom. This is how you would accomplish that:
/**
 * Customize the Header component config.
 *
 * @param array $config
 *
 * @return array
 */
function julia_customize_header_config( $config ) {
	$config['zones'] = array(
        'top' => array( // the zone's id
            'order' => 10, // We will use this to establish the display order of the zones
            'classes' => array(), //by default we will add the classes 'c-navbar__zone' and 'c-navbar__zone--%zone_id%' to each zone
            'display_blank' => true, // determines if we output markup for an empty zone
        ),
        'bottom' => array( // the zone's id
            'order' => 20, // We will use this to establish the display order of the zones
            'classes' => array(), //by default we will add the classes 'c-navbar__zone' and 'c-navbar__zone--%zone_id%' to each zone
            'display_blank' => true, // determines if we output markup for an empty zone
        ),
    );

	return $config;
}
add_filter( 'pixelgrade_header_config', 'julia_customize_header_config', 10, 1 );
Changing the Nav Menu Locations
By default, the component has four elements to play with: the primary-left menu, the branding, the primary-right menu and the jetpack-social-menu.
If you look at the default configuration, you will notice that the branding and social menu have the bogus attribute set to true, meaning that they are not actual nav menu locations, but placeholders for something. The component currently knows what to do with only the header-branding and jetpack-social-menu bogus locations.
Each nav menu location (bogus or not) has a set of attributes:
title: this is the nav menu location name, as it will appear in Appearance → Menus → Display Location; bogus nav menu locations ca skip this as it is not used;default_zone: this is the default zone ID a certain nav menu location will be displayed in;zone_callback: you can use this to pass a callback function that will be called when determining the zone a certain nav menu location should pe displayed; you can use this to alter the default zone and do crazy stuff like moving menus around in certain conditions;order: use the order attribute to enforce a certain order of the nav menu locations within a zone; so all the items that should be displayed in a zone at the point of execution, will be ordered ascending by their order; if omitted it will default to 0;nav_menu_args: these are the same arguments you would pass towp_nav_menu()(more about it here) minus thetheme-locationas we will use the key of the current nav menu location and theechoattribute as we will force it; you can filter these at the point of execution via thepixelgrade_header_nav_menu_argsfilter.
Now continuing with the above hypothetical situation above, lets say we want to have the branding in the top zone and a menu in the bottom zone. This is how you would go about achieving that (repeating the above code for the sake of copy&paste awesomeness):
/**
 * Customize the Header component config.
 *
 * @param array $config
 *
 * @return array
 */
function julia_customize_header_config( $config ) {
	$config['zones'] = array(
        'top' => array( // the zone's id
            'order' => 10, // We will use this to establish the display order of the zones
            'classes' => array(), //by default we will add the classes 'c-navbar__zone' and 'c-navbar__zone--%zone_id%' to each zone
            'display_blank' => true, // determines if we output markup for an empty zone
        ),
        'bottom' => array( // the zone's id
            'order' => 20, // We will use this to establish the display order of the zones
            'classes' => array(), //by default we will add the classes 'c-navbar__zone' and 'c-navbar__zone--%zone_id%' to each zone
            'display_blank' => true, // determines if we output markup for an empty zone
        ),
    );

    $config['menu_locations'] = array(
        'header-branding' => array(
            'default_zone' => 'top',
            // This callback should always accept 3 parameters as documented in pixelgrade_header_get_zones()
            'zone_callback' => false,
            'order' => 10, // We will use this to establish the display order of nav menu locations, inside a certain zone
            'bogus' => true, // this tells the world that this is just a placeholder, not a real nav menu location
        ),
        'primary-menu' => array(
            'title' => esc_html__( 'Main Menu', 'components' ),
            'default_zone' => 'bottom',
            // This callback should always accept 3 parameters as documented in pixelgrade_header_get_zones()
            'zone_callback' => false,
            'order' => 10, // We will use this to establish the display order of nav menu locations, inside a certain zone
            'nav_menu_args' => array( // skip 'theme_location' and 'echo' args as we will force those
                'menu_id'         => 'menu-1',
                'container'       => 'nav',
                'container_class' => '',
                'fallback_cb'     => false,
            ),
        ),
    );

	return $config;
}
add_filter( 'pixelgrade_header_config', 'julia_customize_header_config', 10, 1 );
If you wish to disable the Jetpack social menu, you can use the pixelgrade_header_use_jetpack_social_menu filter and just return false (hint: there is WP function called __return_false so you can use that directly in add_filter).
Customizing the Customify Settings
The component provides its standard Customizer options by registering them through our wonderful Customify WordPress plugin.
Although well thought, you might find the need to add, delete, or 😱 completely replace options (although you would be quite the schmuck for doing this 💩).
Luckily, the component allows you to filter the header options just before they are merged with the main Customify options via the pixelgrade_header_customify_section_options filter (see bellow).
Also you can filter the recommended fonts for all typography controls in one fel swoop via the pixelgrade_header_customify_recommended_headings_fonts filter (see bellow).
Here is some example code to get you started in the right direction:
// To change the recommended fonts you can use the following

/**
 * Modify the Customify recommended fonts for the Header font controls.
 *
 * @param array $fonts
 *
 * @return array
 */
function osteria_change_customify_header_recommended_fonts( $fonts = array() ){
    // just add some font to the existing list
    $fonts[] = 'Some Font Family';

    // delete a certain font family
    if( ( $key = array_search( 'NiceFont', $fonts ) ) !== false) {
        unset( $fonts[ $key ] );
    }

    // or just replace the whole array
    $fonts = array(
        'Playfair Display',
        'Oswald',
        'Lato',
    );

    // Now return our modified fonts list
    return $fonts;
}
add_filter( 'pixelgrade_header_customify_recommended_headings_fonts', 'osteria_change_customify_header_recommended_fonts');

// To change some options

/**
 * Modify the Customify Header section options.
 *
 * @param array $options
 *
 * @return array
 */
function osteria_change_customify_header_section_options( $options = array() ){
    // just add some option at the end
    $options['header_section']['options']['header_transparent_header'] = array(
        'type'    => 'checkbox',
        'label'   => esc_html__( 'Transparent Header while on Hero', 'components' ),
        'default' => 1,
    );

    // or you could add some option after another
    $header_transparent_option = array(
        'header_transparent' => array(
            'type'    => 'checkbox',
            'label'   => esc_html__( 'Transparent Header while on Hero', 'components' ),
            'default' => 1,
        )
    );
    $options['header_section']['options'] = pixelgrade_array_insert_after( $options['header_section']['options'], 'header_sides_spacing', $header_transparent_option );

    // delete some option
    if( array_key_exists( 'header_background', $options['header_section']['options'] ) ) {
        unset( $options['header_section']['options']['header_background'] );
    }

    // change some settings for a specific option
    // First we test to see if we have this option
    if( array_key_exists( 'header_background', $options['header_section']['options'] ) ) {
        $options['header_section']['options']['header_background']['default'] = '#555555';
    }

    // or just replace the whole array
    $options['header_section'] = array(
        'title'   => __( 'Header', 'components' ),
        'options' => array(
                //put your options here
        )
    );

    // Now return our modified options
    return $options;
}
add_filter( 'pixelgrade_header_customify_section_options', 'osteria_change_customify_header_section_options');
Please remember, code like the one above should go into /inc/components.php in your theme.